Wednesday, 1 July, 2026
Backup and Restore the Database
IsoFind stores all analytical data in a local SQLite database. This page covers the two available backup methods, file system storage paths, restoration procedures, automatic schema migration between versions, and the encrypted backup feature available with Advanced Protection.
Database Files
IsoFind uses several distinct SQLite databases, each with a specific role. They are all stored in the IsoFind user data folder.
| File | Content | Critical |
|---|---|---|
| isofind.db | Main database: samples, isotopic data, methods, CRMs, standards, archives, purifications, pipelines, publications, audit logs. Contains 24 tables. | Yes |
| workflows.db | Saved Nexus workflows, session states. | Usage-dependent |
| fractionation_database.db | Reference isotopic fractionation coefficients database. | No (rebuildable) |
| users.db | User accounts, sessions, recovery codes (multi-user mode only). | Mode-dependent |
File System Location
All persistent data files are located in the IsoFind application folder, separate from the software installation directory. This folder is preserved during updates.
| System | Path |
|---|---|
| Windows | %LOCALAPPDATA%\IsoFind\ |
| Linux | ~/.local/share/isofind/ |
| macOS | ~/Library/Application Support/isofind/ |
Backups are automatically placed in the backups\ subfolder of this same directory.
To quickly locate the data folder on Windows, type %LOCALAPPDATA%\IsoFind directly into the File Explorer address bar.
Manual Backup from the Interface
The most direct backup method is the export from the database management menu:
Data Menu
→
Backup Local Database
IsoFind generates a timestamped copy of isofind.db in the backups\ folder. The filename follows the format isofind_YYYYMMDD_HHMMSS.db. This operation is non-destructive and can be performed at any time, even during an active work session.
The same operation is accessible via the local API:
GET /api/database/backup
This route returns the backup file directly as a download.
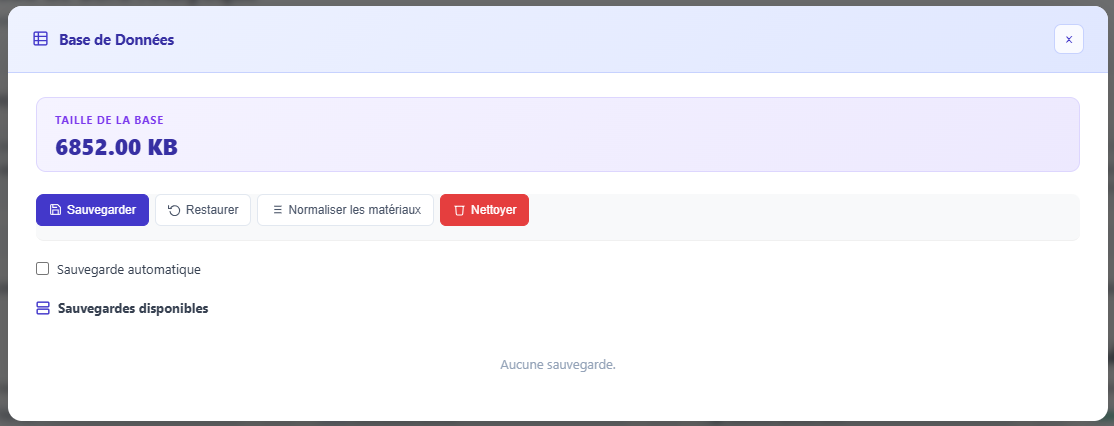 Figure 1: Database management menu with the backup option.
Encrypted Backup (Advanced Protection)
When database protection is set to the Advanced level, IsoFind can create backups encrypted with AES-256-GCM. The encryption key is derived from the master password via PBKDF2-HMAC-SHA256 with 600,000 iterations and a 32-byte random salt.
Protection Menu
→
Encrypted Backup
The procedure prompts for the master password, then creates the encrypted file in backups\ with the extension .protected.bak. The file format is:
| Bytes | Content |
|---|---|
| 4 | Nonce length (big-endian) |
| 12 | Random GCM nonce |
| remainder | Encrypted data (SQLite database + GCM authentication tag) |
The GCM authentication tag ensures that any modification to the encrypted file will be detected during restoration. A tampered backup cannot be silently restored.
An encrypted backup can only be restored using the exact master password used during its creation. This password is not recoverable. Keep the master password in a password manager independent of the IsoFind workstation.
Restoring a Backup
Standard Restoration
To restore a non-encrypted backup, close IsoFind, replace the isofind.db file in the data folder with the desired copy, then restart IsoFind.
Restoration is also available from the interface:
File Menu
→
DB Management
→
Restore
Or via the API:
POST /api/database/restore
Restoration replaces the active database. All data created after the backup date will be lost. IsoFind automatically creates a safety backup of the current database (file .before_restore.bak) before overwriting, allowing for a rollback in case of error.
Restoring an Encrypted Backup
From the Protection menu, the encrypted restore option prompts for the path to the .protected.bak file and the master password. IsoFind decrypts the content in memory, verifies the GCM authentication tag, and then writes the restored database to disk after backing up the current one.
Automatic Schema Migration
At every startup, IsoFind checks the database schema compliance against the expected version. This check is performed by the db_migration.py module before the backend initializes.
The migration strategy is non-destructive: missing columns are added via ALTER TABLE ADD COLUMN, and missing tables are fully recreated. No existing data is deleted or modified. This silent migration ensures forward compatibility when updating the software.
All 24 tables in isofind.db are verified at each startup. If a column was added in a new version of IsoFind, it is automatically created with its default value without user intervention.
Automatic schema migration means that backups from older versions of IsoFind can be restored without manual manipulation. The database is upgraded during the next startup following the restoration.
Backup Best Practices
For laboratories with critical or sensitive data, a few simple rules help minimize the risk of loss:
Perform a manual backup before any bulk operation (large CSV import, global normalization, project deletion). These operations modify many rows in a single pass and are not otherwise reversible.
Store backups off the IsoFind workstation, on a separate medium (network server, external drive, encrypted storage). The backups\ folder is on the same disk as the active database: a hardware incident would affect both simultaneously.
For deployments in sensitive contexts (forensics, defense, regulated traceability), use encrypted backups rather than raw copies. A .protected.bak file is unreadable without the master password, even with physical access to the storage medium.
The Advanced protection level enables scheduled automatic backups. At this level, IsoFind creates an encrypted backup at regular intervals without manual intervention, and the event is recorded in the audit trail.
Recovering Data After an Error
If data has been accidentally deleted, several recovery paths exist depending on the case.
Samples deleted via the archive menu are not destroyed immediately: they are moved to the archive_samples and archive_isotope_data tables in the database. They remain accessible and restorable from the IsoFind Archives module without touching the database directly.
Permanent deletions (from the Archives module or via direct deletion) can only be recovered from a previous backup. The procedure is to restore the backup on a test workstation, export the relevant samples as CSV from that instance, and then re-import them into the current database.
The .before_restore.bak safety backup created automatically before each restoration allows for an immediate rollback if the restore produces an unexpected result.
Integrity Verification
Database integrity can be verified from the protection interface:
Protection Menu
→
Verify Integrity
IsoFind executes the SQLite command PRAGMA integrity_check on the active database and displays the result. A healthy database returns ok. If errors are detected, restore the most recent backup.
This verification is also available via the API:
GET /api/protection/logs/verify
This route verifies the consistency of the audit trail's HMAC-SHA256 chain (each log entry is cryptographically linked to the previous one). An intact audit trail confirms that no entries have been deleted or modified after recording.